Monday, December 2, 2019

Poinsettias

Happy Monday Everyone. Hope you had a wonderful weekend! A few weeks ago I saw a video by Jennifer McGuire where she uses background dies to do partial die cutting on her cards. She explained the process so clearly and her cards looked amazing (as always) so I thought I'd give the technique a try.

I used an older SB lattice die and arranged it in my SB Platinum machine so only the lower right corner was die cut. I really like the look and it is rather simple to do.  Here's my card.


I stamped and colored the Poinsettia twice, then fussy cut and layered them together. This poinsettia is one of my favorite Christmas images from DRS Designs. The Merry Christmas is part of the Christmas Scene Greeting and was stamped with black ink. A strip of gold glitter CS was added along the edge of the die cut part. I then added a piece of green CS to match the leaves to the inside to show through the lattice. 

This was a fairly quick and easy card to create and I really like the way it turned out.  DRS Designs is having a special sale through December 3. You can purchase this gorgeous Poinsettia image for 20% off and there's free shipping on orders over $50. You can check out the details here.

Hope you are enjoying creating Christmas cards for your friends and family. These are my most favorite cards to make!

Thanks for stopping by. 

blessings,
shelia


Monday, November 25, 2019

Snowflakes

Hi Everyone. Hope you had a great weekend and for those of you in the US, I hope you have a wonderful Thanksgiving this week. My kids, along with their families are all coming here for Thanksgiving this year. My husband and I are beyond excited to have everyone together again. Most of the kids and grandkids are hoping we get some snow while they are here. Not sure the weather is going to be cooperative, but with all the talk of snow, I decided to make some snowflake cards for today's post.


I joined the Spellbinders Small Die of the Month Club a few years back and have enjoyed the variety of dies included each month, some more than others. This month has a few snowflake dies and I am loving them. I die cut three flakes in white CS. These are actually sized so you can layer them together. I decided to keep my cards flat and used them as individual flakes. 

I started with the card base, masked off the edges and used some Gesso mixed with water to add splashes for the snowy background. The white frames were created using a couple of Fawn Lawn Rectangle dies. The sentiment is part of the Christmas Scene greeting and was stamped in matching inks and embossed with clear EP, then die cut with a SB banner die. The snowflakes were glued onto the cards and the banners are added with foam squares for some dimension. I added some milky white half pearls to the centers of the snowflakes to finish it off.


These were quick and easy to put together. And since I'm so far behind on my Christmas card making, I'll probably be doing a few more of these.

Thanks for stopping by today.  Have a blessed Thanksgiving!

blessings,
shelia


Monday, November 11, 2019

Holidays

Happy Monday Everyone. Hope you had a wonderful weekend and were able to get into your craft area and be creative. Nothing relaxes me more (and stresses me more LOL) than creating cards. Today I have two cards to share with you: one for Thanksgiving and one for Christmas.

The Thanksgiving card uses the more recent small die of the month set from Spellbinders. I tried to create the lady to look like me - gray hair, but the rest of her really doesn't look like me. I mean I will be presenting some pies at Thanksgiving to my family, but I won't be dressed like this. I'm pretty sure I'll be in jeans! :-)  Anyway, here's my card.


I began by creating the lady with all the die cut pieces. To create her dress and apron, I stamped some Old Olive ink onto white CS using the Polka Dot background image. Once everything was die cut, I glued her together complete with the pie. While that dried I stamped the floor image with Memento Black ink and colored it with Copic markers. I masked the floor and sponged on some TH Distress Antique Linen ink for the wall. The pumpkins were stamped, colored with Copics and fussy cut. I glued two of them onto the floor and added some foam adhesive to one for dimension. The See You Later was die cut using the same die set from Spellbinders. My kids and their families are all traveling here for Thanksgiving so I created a card like this for each one. I'm so excited to have everyone together here for the holidays!

My second card is a pretty quick and easy card. I've been using the Snowman image quite a lot lately. He's adorable as well as easy to color and fussy cut. I especially like him layered on top of the die cut snowflake from Sizzix.


The snowman was stamped, colored and fussy cut before attaching him to the die cut snowflake. The panel and frame were created using a Fawn Lawn rectangle die set. The Peace and Joy greeting was stamped with black ink and then I added the snowflake and snowman. It looks like his scarf and hat band are orange in the photo, but they are red in real life. 

Thanks for stopping by today. Hope you have a wonderful week!

blessings,
shelia

Sunday, November 10, 2019

Merry Christmas

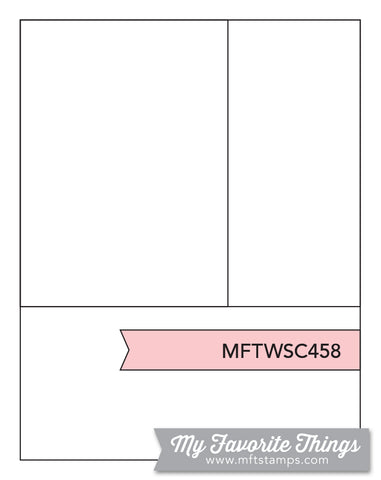
Hi. My card today is for this week's sketch at MFT. It's a great sketch and I enjoyed working with it. Here's the sketch:

And here's my card:


I started by creating my background paper using DRS Designs open plaid background image and stamping it with TH Distress Oxide Candy Apple red ink. I didn't want to cover any of the stripes up so I didn't add the bottom strip of paper like the sketch has. Hope that's ok.  Next I stamped the snowman image with Memento black ink, colored him with Copics and fussy cut. He is layered onto a white snowflake created with a Sizzix die and then the greeting was stamped with VersaMark ink onto black CS, heat embossed with white EP and die cut with a banner die. I really like how this turned out. In fact I created a second card using purple instead of red ink. My niece loves purple so it will be her Christmas card this year.


Thanks for stopping by!

shelia

Monday, November 4, 2019

Merry Christmas


Happy Monday Everyone. Hope you had a wonderful weekend and found some time to get crafty. I decided I had to get started on Christmas cards. I have really neglected to make them all throughout the year like I usually do. So I have lots to make!

I decided to go with a very quick and simple card. Those are my favorite, go to kind of cards. For this one I started with the white panel, embossed it with a Darice Snowflake Swirl EF and attached it to the navy card base. Next I stamped the small navy strip with the snowflake background using VersaMark ink, heat embossed it with white EP and then attached it to the white panel. The die cut snowflake is from Ranger. Isn't it a pretty snowflake?! Last I stamped just the Merry Christmas greeting from the Christmas Scene Greeting with Versafine majestic blue ink, heat embossed it with clear EP, die cut it with a SB label die and popped it up over the snowflake with some fun foam.

This would be fairly easy to mass produce and I may end up going that route! Though I do have a hard time creating more than 4 or 5 of the same card. But this year may be different since I'm so far behind. We'll see.

Thanks for stopping by today and I hope you are further along with your Christmas cards than I am!!

Shelia

Friday, October 25, 2019

Fall Birthday Greetings


This month's birthday challenge at MFT is "Feeling Sentimental."  No images allowed, just sentiments. I have a friend whose birthday is at the end of October and I thought I'd create her card with this challenge in mind. I started to stamp Happy Birthday with as many birthday stamps as I could, but I've done that in the past and decided to try something different.

Since it is Fall I thought I'd die cut the sentiment in various fall colors. I used a SB Birthday die and added it to the white embossed panel using my T ruler to line each sentiment up. I really like the way this card turned out. The colors are perfect for an October birthday.

Thanks MFT for this challenge! It made me try something new. I'm thinking of trying this with shades of the same color for an Ombre look. Wouldn't that be pretty!

Thanks for stopping by!

shelia

Birthday Greetings

Hi Everyone! I have a CAS Birthday card today that uses this week's sketch from MFT. It's a cute and easy sketch.


I started by stamping the cup cake liner and frosting with Hero Arts and Altenew inks, die cut with a MFT square die and layered it onto a larger die cut square. The white panel was embossed with a Darice EF after stamping the birthday greeting with Altenew ink. Everything was attached to the matching pink card base.

I really like the soft pinks with that embossed background. I think this will be a card design I repeat!!


Thanks for stopping by today.

blessings,
shelia

Tuesday, October 15, 2019

Happy Autumn

Hi Everyone. I have a fun fall card to share with you today. I used the challenge at Cupcake Inspirations for my card today.  Here's their yummy cupcake for inspiration.


The challenge is to have something inside your card. I found myself staring at the cupcake wondering how they got that pumpkin shape perfectly inside the cupcake. Is that one of those candied pumpkins that they just put into the cake batter whole? I'd really like to know how this was done. I think it'd be fun to create some of these for my grandkids for Thanksgiving since most of them are young and not into pie. I guess I'll have to google this or check Pinterest!!


Anyway for my card, I cut off a panel in the front, added some transparency between the two pieces and added the die cut leaves behind so they show through the clear transparency.  The greeting is from DRS Designs and was stamped with Hero Arts Orange Ombre ink. I smooched some TH Orange Distress Oxide ink onto my mat, added some water and then made some splashes on the front of the card for some added interest. I really like how this turned out. Plus it was pretty quick and easy to create.

Thanks for stopping by today. I'm off to check out how to make these cupcakes. :-)

blessings,
shelia

MTF Sketch Challenge 458


Hi Everyone!  I haven't posted for several weeks. My husband and I just returned from a trip to Disney World with our daughter and her family. We had such a fun time there visiting the parks and being together. I have so many fun and cherished memories.

I will admit that it does feel good to be in my craft room creating once more. I so enjoy making cards for my family and friends. My husband is one of the pastors at our church and he's in charge of the "Care" program. I make birthday and holiday cards for the shut ins he visits. So I'm working on getting all the Thanksgiving cards made for him. When I saw the sketch at MFT I thought it would work well with the dp I recently purchased.  The sketch is above and here's my card.


As you can tell I let the DP do all the work for this card. I fell in love with the paper when I saw it at Hobby Lobby. I think it's the blue leaves that drew my attention to it. I started with the blue CS panel, added the cut pieces of DP, embossed the entire piece with a SB leaf folder before adding it to the cream card base. The Happy Thanksgiving Day greeting is from DRS Designs. I stamped it with some blue Distress Oxide ink onto the same cream CS, die cut it with a SB banner die and popped it up with some foam adhesive.

The embossing doesn't show up so well in the picture, but it makes such a difference in real life. I didn't the emboss the first card I made and it just looked flat, like something was missing. I embossed the second one and it made such a difference to me.

I'll be making quite a few more of these. I really like how they turned out.

Thanks for stopping by today.

blessings,
shelia

Wednesday, September 25, 2019

Thankful Puppy

 Today I have a card I created as a thank you for a friend who always dog sits for us. Our dog loves when she comes over to stay with her. I used this week's sketch at TMS and a small die of the month set from SB. I tried to make the puppy look as much like our dog as I could. She has one ear that's always turned backwards, so I folded the one ear back. Not quite like in real life, but it'll do.

The thank you is from an Altenew set. The banners were die cut from a SB set. The hearts were created with a couple of punches I've had in my stash forever. I sponged on some Distress ink for some depth. The EF was purchased at a garage sell years ago and I have no idea who makes it.

Here's the sketch from TMS:


Thanks for stopping by,
shelia

Monday, September 23, 2019

Happy Birthday


I didn't have to work today, so I decided to work on some birthday cards and then remembered the sketch challenge at MFT. It's an easy sketch and I thought it would work well with this white and gold DP I have in my stash. Here's the sketch:

This was super easy to create. I cut the strips of DP, added some foam tape to the back and added them to the card front after embossing it with a CB EF. I used some gold CS in my stash to die cut the Happy Birthday with a SB die and glued it onto the top two strips.

Thanks for stopping by today,

shelia


Saturday, September 21, 2019

Sweet Friend

Hi Everyone,

My card today is for the Birthday Project Challenge to celebrate Friendship at My Favorite Things. There's a 20% off on friendship stamps and dies to celebrate! I used an older set from MFT, which I believe is retired now, but still a fav of mine.  Here's my card.


I started with the white panel, stamped the ice cream cone with some brown and red inks, die cut the frame from some MFT stitched square dies, placed the frame where it would go and then stamped the greeting. I added some foam adhesive to the frame to pop it up some. Everything was added to the red card base.

I have a friend who loves ice cream, especially fruit flavored ice cream. This will be for her.

Thanks for stopping by,

shelia

Sunday, September 15, 2019

Give Thanks!


My card today was created using this week's sketch from MFT. It's a fun sketch and I found the orange striped paper in my stash and thought it would be perfect. I stamped this piece a long time ago, used part of it and kept the other part in the scrap drawer. I'm so glad I didn't throw it away!

The card base is cream CS and once the striped panel was added I stamped the greeting with Memento Cocoa ink. The pumpkin pile was stamped onto white CS with Memento black ink, colored with Copics, fussy cut and glued onto the panel. The stamps I used are:

Give Thanks greeting
Pumpkin Pile
Open Plaid Background

I really like the way this turned out. I enjoy doing different challenges, but sketch challenges are by far my favorite!

Thanks for stopping by.
shelia

Saturday, September 14, 2019

Monster Hugs!

Hi Everyone. Today I have a couple of Halloween cards I created for my grandsons using stamps from DRS Designs, the sketch from TMS and the latest small die of the month from Spellbinders.
These dies are adorable and I really like how these cards turned out.


The stamps from DRS Designs are:

Spooky Eyes Background
Monster Hugs
Easy Dot background

The sketch from TMS was perfect for creating two cards. I stamped the green panel with dots using orange DO ink and the orange panel with the spooky eyes using black ink. Once I cut them at an angle for the sketch I had two sets, so it was easy to create two cards. Here's the sketch.


I used the most recent small die of the month to create the little boys in their skeleton costumes and an older small die of the month set to die cut the little bats for embellishments.

Thanks for stopping by.

shelia

Thursday, September 5, 2019

Happy Fall Y'all

I am so ready for fall and the weather here has been pleasantly cool with a nice breeze - perfect for spending time outdoors and enjoying some pumpkin spice coffee. Yum!  So this cooler weather inspired my card for today.


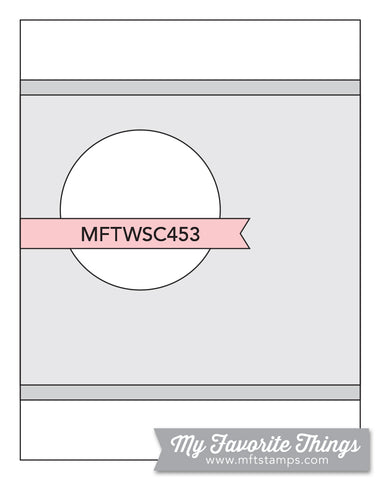
I started with a white panel cut to 5.25 by 4 inches and stamped DRS Designs' 4 in 1 Harvest Designs with Memento Black ink. I only stamped on the top and bottom of the panel since the middle was going to be covered up. All the little images were colored with Copic markers. Next I stamped the Pumpkin Pile with Memento Black ink, colored with Copics, cut it down and layered it onto yellow CS, I used the same yellow CS to create the little banner and stamped the Happy Fall Y'all greeting with SU Pumpkin Pie ink.

The sketch design is from MFT weekly sketch challenge 453. Here's the sketch.


Thanks for stopping by!

shelia

Happy Anniversary


Hi Everyone,

Hope you are having a wonderful week! The weather here in NW Ohio has been perfect the last week or so. Makes me want to be outdoors, but I had to come inside and create an anniversary card for some special friends.  I used this week’s sketch from TMS. Here’s the sketch.


I had some gold dotted paper in my stash that I thought would work nicely for the background. The Anniversary greeting is from DRS Designs. The die cut leaves are from Concord & 9th and the gold and white ribbons were in my stash. I heat embossed the greeting with gold EP. once I got all the pieces together this was a quick & easy card to put together.

Thanks for stopping by!

Blessings,
Shelia

Friday, August 23, 2019

You're the Sweetest


My Favorite Things has another great sketch challenge this week. I really enjoy doing sketch challenges. There's something about them that really gets my mojo going. Here's the latest sketch.


And here's my card.


I started by stamping and die cutting the ice cream bars and sticks with various inks in my stash. Once they were put together I cut the strip of Kraft CS, embossed it with the Swiss dots folder for some dimension. I marked where it would go on the card base and then stamped on some tiny hearts, stars and circles with the same inks as the ice cream bars. The greeting was stamped with the same ink as the ice cream sticks. The ice cream bars were added to the strip with foam adhesive. I wanted them to sparkle a little, so I added some clear Wink of Stella to them. I need some thank you cards and thought this would make a sweet thank you.

Thanks for stopping by,
shelia


Thursday, August 22, 2019

Boo!

Hi Everyone. It's getting to that time when everything fall starts to happen and things start to move quite quickly. So I decided I really should get started on some Halloween cards for my grandkids. When I saw this week's sketch for TMS, the perfect image popped into my mind. So here's my first Halloween card this year.


I started by stamping the Boo image with Memento Black ink onto white CS, colored it Copics, die cut and layered it onto a black panel. The Happy Halloween greeting was stamped with VersaMark ink onto black CS, heat embossed with white EP and die cut. The orange panel was embossed with a spider web EF and layered onto black. The vellum ghost was die cut using a Small die of the month set from SB and is glued on behind the greeting banner to hide the glue. Once everything was put together, I added some black and orange rhinestones so complete the look.

Here's the sketch from TMS.


Thanks for stopping by!

shelia


Wednesday, August 21, 2019

back to school!

Hi Everyone,

Today's card is for this week's challenge at the Paper Players. The challenges is a CAS for a child. I created this card to send to my granddaughter who is starting 2nd grade next month. I can hardly believe that!

To create this I started by die cutting all the pieces to make the little girl using a Small Die of the month set from SB. I added some white gel pen to her eyes to give them some life. The school supplies were stamped with a very old SU set that I've had in my stash forever. After stamping them I fussy cut them. The greeting is from Altenew and the ruler is from DRS Designs. After stamping the ruler I fussy cut it and added it to the card first. I created a similar card for her older brother. He's going into 8th grade, that's even more unbelievable!

Thanks for stopping by.

happy stamping,
shelia

Monday, August 19, 2019

Snail Mail

Happy Monday Everyone. Hope you had a great weekend and found some time to get inky! My card today was inspired by a painted jar I saw on the Splitcoast Stampers Inspiration Challenge Saturday and I decided to use this week's sketch for my card layout. It's a cute sketch.


I started by stamping the Script background with Stazon Dove Gray ink, die cutting the panel with a Fawn Lawn rectangle die.  The main image was stamped with Memento Black ink onto white CS, colored with Copics, die cut with a SB circle die and added to the background panel. Next the banner and circle were die cut with SB dies and glued into place. The sunflowers were created using a flower punch I've had in my stash forever. I bought in Germany when we lived there and have no idea what brand it is. It makes a cute little flower. I added some black dots to the centers with a gel pen. The leaves were die cut with a small leaf die from SB. Once everything was attached to the script panel, some fun foam was glued to the back and then onto the gray card base for some dimension. Some Nuvo drops were added to the tiny stamped flower and some blue Distress Ink sponged on for the sky.

I enjoy sending and receiving cards via snail mail, don't you? I just have to decide who to send this one to. 

There's still time to join in the Cupcake Inspiration Challenge that DRS Designs is sponsoring. The challenge is to use glitter on your card. And the prize is a $20 gift voucher to DRS Designs on line store. You can see details for the challenge here.

Thanks for stopping by today.

Sunday, August 18, 2019

You're an Angel


Hi. This quick and simple card was created for MFT's sketch Challenge. Here's the sketch:


I purchased this darling MFT angel image at a garage type sale at my local craft store. These Pure Innocence images are so adorable. Anyway, I stamped the image with Memento Black ink, colored her with Copics and then die cut using a Concord and 9th die. Instead of stamping the greeting on a strip of CS, I stamped it below the main panel. I didn't want to cover up this sweet little angel. :-)

You can find details of this sketch challenge here.

Thanks for stopping by


Wednesday, August 14, 2019

Awesome!

My cards today were created for this week's Sketch Challenge at Tuesday Morning Sketches. Since I wanted some cards to send to my grandkids who started school this week I decided to go with their favorite pet and color. I used last month's Small Die of the Month set to create my kitty and puppy. I think these dies make the cutest little critters. Plus there's the dish that has a slit in it so you can add the dog bone or fish. So fun!

Here's the sketch from TMS.


And here are my cards:


I sponged some TH DO Broken China ink using a homemade cloud stencil for the sky. The kitty, bows, fish bones and grass are all die cut with the Small Die of the Month Kit from July. The small panel was stamped with the cat background from DRS Designs. The greeting is from Altenew's Painted Butterfly set. I used fun foam to pop up the kitty panel. My granddaughter is gonna love this.

The next card was created the exact same way. I just used the dog dies, dog Background image from DRS Designs and changed up the colors. I created this one for my grandson.


Thanks for stopping by today.

blessings,
shelia