Friday, May 31, 2013

Challenges

Hello Everyone,

Here are a couple of cards I made this week for two different challenges. The first is for DRS Designs' "Trees Please" Challenge. You have to use at least one tree on your card. I'm in need of several anniversary cards, so I decided to use DRS Designs Valentine tree and make it an anniversary card.


The white card based was stamped with DRS Designs' Interlocking hearts background in Pretty in Pink ink. The Happy Anniversary greeting was stamped in Memento Black on white CS and layered on Pretty ink pink CS. The Valentine Tree was stamped in Memento Black on white CS, colored with Copics, and die cut with nesties. Before die cutting, I sponged Bashful Blue ink for the sky and stamped DRS designs Easy Grass Background in Old Olive ink. I also sponged some Old Olive and More Mustard ink around the grassy area. Before attaching the image to the card base, a strip of Pretty in Pink CS was punched with a MS punch and added to the base along with some white sating ribbon.

My second card is for Lesley's Merry Monday Challenge. You can see details here. Actually this would also work for this week's DRS Designs challenge since I used the Funky Tree image!!  :-)


A panel of white that was embossed with the CB snowflake embossing folder was added to the Real Red card base. The main image was stamped on white CS twice. One was colored with copics and fussy cut to be added to the main image panel. I used a cloud that was punch with a Fiskars punch, to sponge some Bashful Blue ink around for the sky. Red Rhinestones were added for the ornaments on the tree. I used my Creative Memories paper cutter to cut the curvy white panel under the tree. After stamping the Greeting in Memento Black ink, some Diamond stickles were added to the edge for the snow. The entire white panel was layered with real red CS, before attaching it to the embossed panel. I like the festive look of this one.

Thanks for stopping by and taking a look. We'd love to have you join in these challenges!!

Until next time,
shelia

Monday, May 27, 2013

Happy Memorial Day


I hope you have all had a great Memorial Day weekend! I'm in Georgia visiting my son and his family, including our brand new grandson! It's been awesome and I'm afraid I don't want to go home to Ohio!!

In honor of this Memorial Day, I have a patriotic red, white and blue card to share with you. I started by stamping the Interlocking Star background in VersaMark ink on blue CS. After embossing the background with detail white embossing powder, it was layered on some red CS. The strip of red CS on top was punched with a star border before adding the patriotic ribbon. The Liberty Bell image was stamped in Memento Black ink on white CS, colored with copics, fussy cut and attached with glue dots. The USA Thanks greeting was stamped in Memento black on white CS, colored with copics, and layered on red CS. Everything was attached to the white card base. I really like the look of this. Hope you do too!

This week's challenge is to use paper punches on your card. We'd love to have you join in the fun!!

Thanks for stopping by.

Until next time,
shelia

Monday, May 20, 2013

Big Deal Birthday!


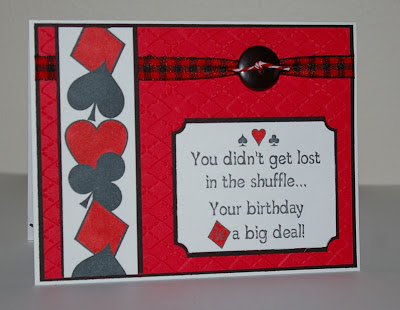
Hi Everyone. Today I have a card that I made for my dad for his birthday. He absolutely loves to play cards, so when I saw this new stamp I knew what his card would say this year!

The Big Deal Birthday greeting was stamped in Memento black ink on white CS, colored with a red copic, die cut and layered on black CS. The 4 Suits Vertical image was stamped in Memento black ink on white CS, colored with copics and layered on black CS. The red panel was embossed with a CB argyle folder and layered on black CS. Red and black gingham ribbon, baker's twine and a black button complete the look.

My dad loved it, by the way!! Thanks for stopping by today.

The challenge this week is Graduation!! You can see details here. We'd love to have you join us.

Until next time,
shelia

Monday, May 13, 2013

Creating Yourself!


Happy Monday Everyone. Hope you all had a great weekend and enjoyed celebrating Mother's Day! 


Today's card features a sentiment that could be used for a graduation card or an encouragement card. I started by stamping the greeting on white CS with Memento Black ink, punched the corners and layered it on Bazzil gold CS. The Tool Border was also stamped on white CS with Memento Black ink. After coloring the tools with various Copics, the image was layered on the same gold CS. The black panel was embossed with a CB Chevron folder. The yellow measuring tape ribbon was added before attaching the panel to the gold card base. I bought this ribbon several years ago at a garage sale and this is the first time I've used it. I think it goes great with this tool border! Hope you like it!!

This week's challenge is to use circles on your card. There's still time to join in the fun!!  You could be the winner of two DRS Designs' stamps of your choice!

Thanks for stopping by today.

Until next time,
shelia

Thursday, May 9, 2013

DRS Designs Challenge #69 Circles

DRS Designs Challenge this week is to use circles. We have a lot of birthdays during the summer in my family so I created another birthday card for this challenge.


When I saw the challenge was circles, I immediately thought of my EK Swiss Cheese border punch. I chose teal and yellow CS, punched some strips and added them to a white panel. The top of the white panel was stamped in Taken with Teal ink with the Interlocking Circle Background stamp.  I don't know if you can see, but the horizontal yellow strip was embossed with a circle EF from Darice before attaching it to the punched strip. A button and some teal baker's twine were added too. The main Confetti Alert image was stamped in Memento Black in on white CS, colored with Copics, cut with Nesties and layered on a scalloped circle. All those little yellow and teal circles from the Swiss Cheese punch will be inside this card when it is given to the birthday girl!!

There's still plenty of time to participate in this week's challenge! Hope you can join the fun!

Thanks for stopping by.

Until next time,
shelia

Wednesday, May 8, 2013

ODBDSLC153


Our Daily Bread Designs has a challenge this week using the word "spring." You're to create a card using elements starting with at least 4 of the letters in the word "spring."  I used this week's Sketch Challenge at SCS. It's a great sketch!!

S - sentiment; P - paisley embossing folder; R - rhinestones; I - ink; N - Nesties


The main image, from ODBD Special Girl stamp set, is stamped in Memento black on white CS, colored with Copics, die cut with a Nestie and layered on a pink lacy square nestie. The two sentiments, from the same set, were also stamped with Memento Black ink on white CS, cut into rectangles, embossed with a Paisley CB folder and then layered on pink CS. The large white panel was embossed with the same CB folder and layered on pink before attaching it all to the white card base. Some pink rhinestones were added to complete the look.

Thanks for stopping by!

until next time,
shelia

Tuesday, May 7, 2013

Merry Monday Challenge #61

Hi. This week's sketch for the Merry Monday Challenge is a simple, yet beautiful design. I dug out some old stamps for today's card. My snowflake is an older Holly Berry House image and the sentiment is a really old SU one. I had to do some dusting before stamping this morning!!


The snowflake and sentiment are stamped in Bravo Burgundy ink and heat embossed with clear embossing powder. I added some black felt ribbon to the upper right hand corner along with three burgundy rhinestones. The white panel is layered on a piece of Bravo Burgundy CS and everything is attached to the white card base.

Here's the sketch design.             

Thanks for stopping by today!

Until next time,
shelia

Monday, May 6, 2013

Happy Father's Day!


I don't about you, but when I was in elementary school and had to walk a couple of blocks to school, I'd always complain about it, especially when the weather was cold. I can still remember hearing my dad talk about how he had to walk 5 miles to school, in the snow and uphill both directions. I don't know how old I was before I realized what he was saying made no sense! So when I saw this Father's Day Greeting, I knew what my dad's card would say this year!!  :-)


I started with a dark green card base since green is my dad's favorite color. After adding a layer of chocolate chip CS, a white layer was added that was stamped with the Chevron border in Chocolate Chip and Handsome Hunter inks. The strips were stamped with the hiker boot prints in Choc. Chip ink and layered on the same brown and green CS. The Greeting and Silhouette hiker image were both stamped in Choc. chip ink and layered on green and brown before attaching them to the base. Some tiny brown half pearls were added to the right corner to complete the look.  I think my dad will get a kick out of this!

Don't forget this week's challenge is to use butterflies on your card. We'd love to have you join in the fun!

Thanks for stopping by today.

Until next time,
shelia

Saturday, May 4, 2013

Challenges

Well I finally found some time to make a card for the Merry Monday Challenge. Here's the sketch we were to use.


And here's my card.


I started by stamping DRS Designs Sand, Water, Snow line stamp in Bashful Blue ink on white card stock, then I use a nestie to cut out the white panel. I sponges some Bashfull Blue and Navy Blue inks for the sky while the panel was still in the die. Crystal Stickles were used to outline the snow lines. While waiting for the stickles to dry, the Christmas Lamp Post was stamped with Memento 'Black ink on white CS, colored with Copics and fussy cut. After the stickles were dry, I added the lamp post with pop dots. The Merry and Bright Greeting was stamped with VersaMark ink on dark blue CS, and heat embossed with detail white powder. After cutting it to look like a banner, it was layered on glitter white CS that was also cut in a banner shape. The dark blue panel was dry embossed with the CB snowflake folder and everything was added to a white card base.  I really like how this turned out. Hope you do too.

This week's challenge at DRS Designs is to use butterflies on your card. I love butterflies and wanted to try a technique I saw on Stamp TV. I started with a white CS panel, sponged Bashful Blue, Pretty in Pink and Barely Banana inks in strips all over the CS. Nest I stamped the Textured Butterfly several times in VersaMark ink and heat embossed them with clear embossing powder. Once cooled, Old Olive ink was sponged all over the panel. I used a paper towel to wipe off the ink from the butterflies so the underlying colors could show through. I love the results of this technique!


The butterfly panel was attached to some Old Olive CS and then attached to the white card base. The Happy Birthday Greeting was stamped in Memento Black ink on white CS. The textured Butterfly was stamped three times in Pretty in Pink without re-inking the stamp, then I used oval nestie dies to cut it out and layer it. Some tiny pink half pearls were added to the main butterfly to finish the look. I sent this to my mom for her birthday this week. She loved it!! :-)

If you have time to join in these challenges we'd love to have you play along!!

Until next time,
shelia