Monday, November 30, 2020

Love and Laughter

 Happy Monday Everyone. Hope you had a wonderful weekend and found some time to get creative. I've been having fun playing with the newest images DRS Designs recently released. I think you are going to like them! 


Today's card features the new Love and Laughter greeting. I paired it with a house image from the all in one Christmas Village. Since it's almost winter and that means snow here where I live, I thought a snowy house would be appropriate. Anyway, here's the card.


The card is pretty self explanatory. I stamped the greeting and image onto white CS, colored the image with Copics, die cut and layered them onto cranberry CS. The white panel was embossed with a Darice EF and layered onto the same cranberry CS before attaching it to the white card base. A few cranberry gems complete the look. I really like how this card turned out. I think it's perfect for someone purchasing a new house this winter.


This next card uses the same greeting, but this time I paired it with a die cut house. I have no idea what die was used to cut the house. I die cut it years ago at a friend's house, but never used it. Because of the size of the die I went with a slim line card.



I created the card base with black CS and then die cut the white panel with a Dare 2 B Artsy die. Using some Nuvo Deluxe glue I added the die cut house towards the bottom of the panel, leaving room at the top for the greeting, which was stamped and die cut then sponged with some light blue ink while still in the die. It's layered onto black CS and then popped up with foam adhesive. A few enamel dots were added and the card is done!

Thanks for stopping by today!

blessings, shelia


Monday, November 23, 2020

Have a Ball on Your Birthday!

  I know Thanksgiving is this week here in the USA, but with these fun new images from DRS Designs I just had to share some birthday cards I created.


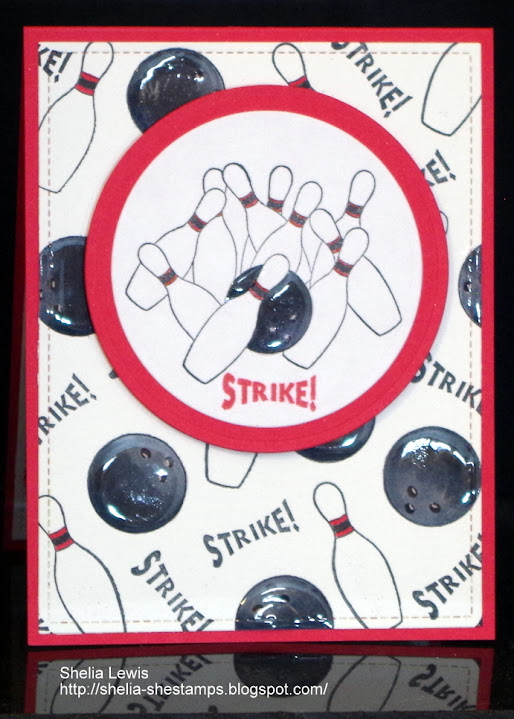
This first card uses the new Strike 3 in 1 Bowling Designs image (214D). I cut the image apart so I could place the different images where I wanted and stamped them with Memento Black ink onto white CS, die cut with a Fawn Lawn rectangle die and then colored the images with Copics. I also stamped the Bowling Strike image (240H) onto white CS, colored it with Copics, and die cut it. I used my Misti to line up the word strike from the 3 in 1 bowling Design image and stamped it in Memento Ladybug red ink. Before putting the card together I decided to add some Nuvo Crystal Glaze to the bowling balls so they would be shiny and stand out more. Bowling balls are shiny, aren't they? I haven't been bowling in ages! Anyway, once the glaze dried I put the card together, using foam dots for the main image. I really like how this card turned out. Wouldn't this be the perfect birthday card for an avid bowler? My dad, when he was younger, liked to bowl so this will probably be his birthday card this year. 

My next card uses the new Ball on your Birthday greeting (207D) along with the basketball image from the 4 in 1 sports image. I stamped the basketball onto white CS, colored it with some Copics and fussy cut them. The background panel was embossed with a Sizzix Cobblestone 3d EF. I think it looks a lot like a basketball. The new greeting was stamped onto cream CS and die cut with a banner die. I also created a banner for the basketballs and popped them up with some foam dots.


Thanks for stopping by today. Hope you have a wonderful Thanksgiving and find some time to get crafty. You can see all the new images here at DRS Designs,

blessings,
shelia


Monday, November 16, 2020

Merry Christmas

  Happy Monday! Trust you had a great weekend and found some time to get creative. I don't know about you, but I just got my Thanksgiving card in the mail and have been busy working on Christmas cards. I do a few Christmas cards each month, but I still end up scrambling to get all of my Christmas cards completed on time. Yikes.


This card was fairly simple to create. The most time consuming part was coloring the image. I was a little intimidated by this image with its tiny leaves, berries, etc. But it really wasn't all that difficult to color. Once it was colored I die cut it with a SB oval die and layered it onto some cranberry CS. The white panel was embossed with a CB embossing folder and then attached to the cranberry card base. I did add some Nuvo Crystal Glaze to the flame and holly berries. My mom loves cardinals and I know she will love this card.


Hope you are doing well. Thanks for stopping by. You can see this gorgeous image and all the other new images here.


blessings,


shelia

Monday, November 9, 2020

Thinking of You

  Happy Monday! Are you having unseasonably warm weather where you live? We are!! Today and the past few days have been in the 70s with lots of sunshine. And to think we had snow flurries last Sunday. Such goofy weather, but I have been enjoying the warmth. Even with the warmer weather, I'm still  working on Christmas cards.


I saw a Jennifer McGuire video recently where she uses Perfect Pearls in a variety of ways. Since I have had some Perfect Pearls in my stash for years, I decided to try out one of her techniques. I stamped the trees from the tree and mountain 2 in 1 image with a couple of different green inks. I left the stamp in my Misti so I could stamp the image again with VersaMark ink and then I applied a little Perfect Pearls to just the tops of the trees. I stamped it again with VersaMark ink and then heat embossed with clear EP. I did that three times and fussy cut the trees. I splattered some pearly white water color paint onto some navy CS which I used for the background panel and die cut for the focal point. The 3 rows of trees were added before I die cut the circle. After stamping the greeting onto the white panel the circle was added with foam adhesive for some dimension. It's hard to see the sparkle in the photo, but it really does shine in real life.


Thanks for stopping by today. Hope you are getting a head start on your Christmas cards. You can get some inspiration at DRS Designs here.


blessings,


shelia

Monday, November 2, 2020

Gnome for the Holidays

  Happy Monday Everyone. Hope you had a great weekend and found some time to get creative. We had some snow flurries yesterday with strong bitterly old winds, so it was a good day to stay in and stamp! Here's the card I created.


I started with a piece of watercolor CS, stamped the woodgrain background onto it and then sponged on some DO inks in browns. While that dried I stamped, colored and fussy cut the peeking gnome and toad stool images. The string of Christmas lights was stamped with Versafine Black ink and heat embossed with clear EP. I used a small paintbrush and water to remove the DO ink from the light bulbs and colored them with various Copic Markers. Next I die cut the window from the front panel, marked off the inside of the window and stamped the new Gnome for the Holidays greeting and potted Christmas tree image, which I colored with Copics. Once everything was colored, I assembled the card. The woodgrain panel is popped up with foam adhesive, as is the peeking gnome. The mushrooms and grassy border are glued on. Last I added some clear Nuvo drops to the Christmas lights and tree bulbs and then some white Nuvo drops to the white spots on the mushrooms.

I really like how this turned out. That peeking gnome is my favorite gnome and I knew I wanted to use him on my card.

Thanks for stopping by today. You can check out the newest images as well as all the awesome images and greetings from DRS Designs here.


blessings,

shelia