Monday, March 8, 2021

Get Your Irish On!

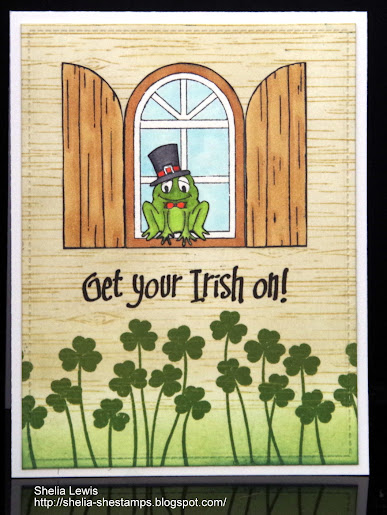
 Happy Monday everyone. Trust you had a great weekend and found some time to get creative. I've been enjoying playing with the newest St. Patrick's Day images from DRS Designs. My first card features the new Arched Window image and the little frog/toad from the Toad Made for you Recognition image.


To create my little scene I first stamped the silhouette shamrocks with Memento Bamboo ink, then I stamped the wood grain image with Distress Antique Linen ink. I sponged on some DO inks to color in the scene. The Arched window was stamped onto white CS with Memento Black ink, colored with Copics and fussy cut. I did the same thing with the little toad and the top hat from the Top Hat St. Patrick's Day Greeting. Once everything was attached to the panel the Get Your Irish On greeting was stamped with Versafine Black ink and then the panel was added to the white card base.


My next card is rather simple, but I really like the look. I did the same technique for the background that I did a couple of weeks ago. The silhouette clover image was stamped with some Altenew green ink. I stamped the image twice before reinking to give the two different shades of green. The Top Hat St. Patrick's Day greeting was stamped with Memento Black ink, colored with copics and die cut. I layered it on a couple more die cut rectangles to it some dimension,


I really like the simple look of this card. It would be easy to mass produce. I'm going to look through my stamps and see what other solid images I have that could be used to create a background like this. Easy peasy!


Thanks for stopping by today. You can check out all the new images at DRS Designs here.


blessings,

shelia

Monday, March 1, 2021

Happy March 1st everyone. Hope you had a great weekend. It was quite warm here and lots of the snow melted away. There's still some on the ground, but not much. Definitely has me thinking of spring. I even saw some buds on a flowering bush while walking my dog over the weekend!


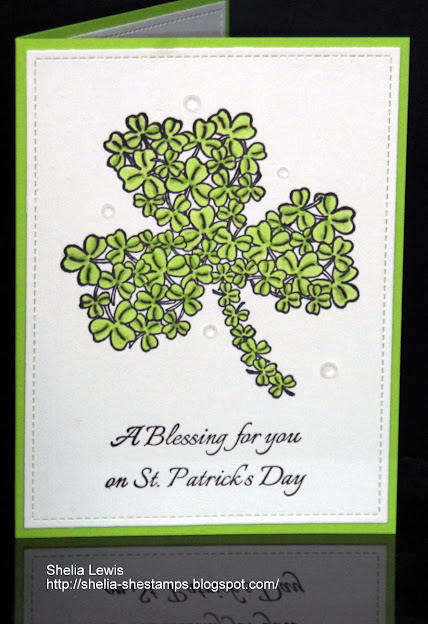
I have another St. Paddy's Day card to share with you today that features the Shamrock of Shamrocks image the the St. Pat's Blessing greeting.


The large image was stamped onto the white panel with Memento Black and colored with Copics. The greeting was stamped with Versafine Black ink below the image and the panel was added to the green card base. Some clear gems wer added around the image for dimension. Here's another card using this same image and greeting.


This time I stamped the image with VersaMark ink and heat embossed with white embossing powder. Once it cooled I used a couple of DO inks in greens and water colored the little shamrocks. I added the same greeting and clear crystal gems. It's layered on a darker green card base. I think I like the black outline of the image on the first card better than this one.  Though it is fun to experiment with different coloring techniques.

You can see all the new St Patrick's Day images at the DRS Designs' on line store. Thanks for stopping by.

blessings,
shelia


Monday, February 22, 2021

blessings


Happy Monday everyone. Hope you are doing well and had a good weekend. We are having our first day with temperatures above freezing in over two weeks. It's amazing how warm a few degrees above freezing can feel!! I am grateful for this warmer weather. Not sure it is here to stay, but I'll definitely enjoy it while it's here!


I have another St Patrick's Day card for you today that features the new Top Hat St. Pat's greeting. I stamped it onto white CS, colored it with Copics, die cut it and layered it onto some black CS. I did go back and added some Nuvo Aquaflow shimmer to the gold coins in that pot. The green panel was embossed with a Darice clover folder and layered onto a black card base. Once everything was put together I added some flat gold sequins. I've had these sequins for a while and have no idea where they came from, but I thought they would look good with the pot of gold.


This next card features another new St Pat's greeting and uses the silhouette shamrock image for the background.


I started by stamping the silhouette clover with two green inks from Altenew onto white CS to create the background. Once the stamping covered the entire panel I die cut it with a MFT rectangle di and glued it onto the green card base. The new St. Pat Blessing  was stamped with the same green ink onto white CS, die cut with a stitched oval and layered onto the same green CS as the base. Some clear crystal gems were added around the sentiment to complete the look. I really like the way this card turned out. I created this for a challenge at Splitcoast Stampers called Camo Fun. You can see the challenge here.

Thank you for stopping by today. You can see these new images along with all the other new images here.

blessings,

shelia

Monday, February 15, 2021

Irish Blessings

 Happy Day after Valentine's Day! Which means it's time to move on to the next holiday. So I have a couple of St. Patrick Day cards to share with you featuring some of the newest images from DRS Designs.


This first card features the new arched window image. As soon as I saw it I knew I wanted to make a cottage looking scene. So I grabbed some water color CS, stamped the brick wall image with Versafine black ink, heat embossed with clear EP and then used some DO inks to color in the bricks. I started with DO Fired Brick, but it looked too red so I mixed in some Vintage Photo. While the ink dried I stamped the arched window image with the same black ink, heat embossed with clear  EP, heat embossed and colored it with some Vintage Photo and Tumbled Glass DO inks. Once that dried I fussy cut the image and glued in onto my wall. The new Blessing on St. Patrick's Day greeting was also stamped with Versfine black ink and heat embossed with clear EP. I used Frayed Burlap to sponge on the ground area. I decided it needed a little green so I stamped the Shamrock Swag image, colored it with Copics, fussy cut and glued it at the bottom of the window.


This card was super easy to create and uses a technique I learned from another Natasha Foote video. First I made a rectangle mask for the center of the card and sponged some DO rustic wilderness ink in the opposite corners, fading out towards the ends. Next I masked off the edges with the sponged ink and stamped the silhouette shamrocks in the two corners, The new Top Hat St. Patrick's Day greeting was stamped with Memento black ink in the center and colored with Copics. A few clear crystal gems were added to finish it off. I really like how this card turned out and will definitely be trying this technique again.

Thanks for stopping by today. You can check out all the newly released images here.

blessings,
shelia


Monday, February 8, 2021

Freezin!!

  Happy Monday everyone. Hope you had a great weekend and found some time to get creative. It is bitterly cold here in NW Ohio, so I was quite content to stay indoors and stamp away the weekend! It's so cold our poor dog doesn't want to go for walks. She just dashes into the backyard, does her business and dashes back in doors! I really don't mind since I have little to no desire to go outdoors either!! With that idea in mind, here's my first card for today. It truly is Freezin' Season here!


I started with the dark blue CS, splattered some white gesso mixed with water to create the snow, then I used a MFT window die to cut out the window and then the Freezin season was stamped with VersaMark and embossed with white EP. I used the window in the blue panel to mark and die cut the same window in the white card base. Then I stamped and colored the Skating Snowman inside the card. I honestly believe if this snowman were here right now, he'd be skating off to someplace a tad bit warmer! Wind chill has our temps in the minus digits. That's pretty cold, even for a snowman.


My next cards are for Valentine's Day.  DRS has some great new Valentine images and greetings.


This card uses the new Bee my Valentine greeting and the new Flower Hearts along with the sweet little bitsy bee. The flower hearts were stamped onto pink CS with VersaMark ink, heat embossed with white  EP, die cut into a heart shape and then cut into strips. The strips are attached to a heart die cut from acetate and popped up with foam adhesive. In real life it looks like the heart is floating on the card. I got this idea from Natasha Foote. You can see her video here.


This card uses the same greeting, but this time I stenciled the honeycomb using  some DO inks. The greeting was stamped in the corner. The bitsy bee and the Happy bee were stamped, colored and fussy cut. They're attached with foam dots. Some clear gems were added for embellishments. The panel was attached to a black card base.

Thanks for stopping by today. Hope you're staying warm!

blessings,
shelia


Monday, February 1, 2021

Peace on Earth

Hi Everyone. I've created a card for the CRAFT Challenge that DRS Designs is sponsoring this week. It's a Christmas challenge and since those are my most favorite cards to create, I had to play along. I'm a little late to the party, but ...


I started with a piece of heavy weight water color paper, stamped the wise men image and the Peace on Earth greeting with Versafine Black Onyx ink and then heat embossed with clear EP. I used my Misti so I could stamp it several times to get good coverage. Next I stamped the star from the set with VersaMark ink and heat embossed it with white EP. A mask was created with some Post It tape so I could sponge on some blue Distress Oxide inks for the sky as well as brown for the ground. A Fawn Lawn stitched rectangle die was used to cut the panel and then it was attached to the white card base. 


This was fairly easy to create and I do like how it turned out. I try to make a few Christmas cards each month so I don't have to scramble come December. I didn't get any made in January so I'm behind. At least I have one card made for Christmas 2021!!


Please check out the challenge here. You could be the winner of a $20 gift voucher to DRS Designs. They have some awesome stamps in their on line store here.


Thanks for stopping by today.


blessings,

shelia

 Happy Monday Everyone. Well we didn't get the promised snow last Monday, but we did get some yesterday and today. It is so pretty. This is the first time hubby has had to use the snow blower this season. So glad it started right up for him!


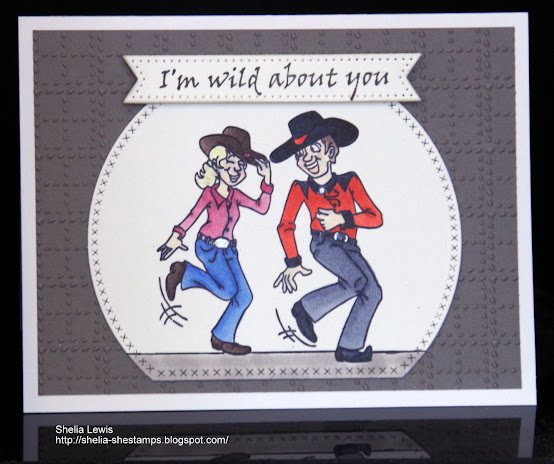
I have a Valentine card to share with you today that uses the new Wild About You greeting. I have enjoyed looking for different images to pair it with and looking at everyone else's cards and seeing more ideas. Today I've paired it with The Western Dancing Couple. They look like they're pretty wild about each other, don't you think?!


First I stamped the dancing couple onto white CS with Memento black ink, colored them with some Copics and die cut them. The new greeting was stamped with Versafine Black ink and die cut with a banner die. The gray panel was embossed with a Sizzix EF. After gluing the gray panel to the card base the other two pieces were added. The sentiment is popped up with some foam adhesive. 


I recently saw a new technique by Jennifer McGuire and decided to give it a try. Since I needed a thank you card...


Several different thank you images were stamped onto the blue card base with HA white ink. Once the ink dried a circle was die cut out of the front of the card and a smaller yellow circle was die cut as well as the orange thanks. The yellow circle was centered in the opening and the word thanks was glued onto the circle and onto the edged of the card base where they overlap. There are 3 layers for the word thanks so it's a little more sturdy than if it was only one layer. If I make this type of card again I'll make the opening a little smaller or use a longer die cat word. :-)

Here's a look at the inside.


The light blue circle shows through when the card is closed. The others are hidden.. These are the thank you images I used. Some of them were only partially used.

Give thanks

Deco thank you

Sincerely sympathy thank you

Brush thank you


I also used some small hearts to fill in the gaps. They came from the following images:

Love bug

Small Silhouette Heart

Hearts and scrolls


Thanks for stopping by today. Be sure to check out all the new images here.


blessings, 

shelia