Monday, March 27, 2017

the Beauty of Springtime

Hi everyone. Hope you had a great weekend. My life has been crazy busy lately and I am so thankful to be able to stop and get creative in the craft room. It really helps me to relax and refocus when I'm stamping, coloring and creating cards. Wonder what I used to do before I became addicted to stamping?! Seems like a life time ago.  Anyway, my card today features two new stamps from DRS Designs: the Sneaky Bunny and Springtime Easter Greeting.


I started by stamping the Sneaky Bunny image onto white CS with Memento Black ink. Once the image was colored with Copics, the Springtime Easter Greeting was stamped with Versafine Black Onyx ink. Some baker's twine and a yellow button was added to the white panel before gluing it onto the yellow card base. The purple frame was die cut with a Spellbinder's die. To add a bit of shimmer some clear Wink of Stella was added to the bunny's ears and the centers of the flowers. Don't you love how this little bunny is nestled in the middle of the flower pot!

Thanks for stopping by today and please stop by our on line store and check out all the new images! You can find the new images here.

blessings,
shelia

Monday, March 20, 2017

Spring Birthdays

Hi Everyone! Spring is here. And after the winter snow storms last week I'm pretty sure most everyone is ready for spring. I know I am!! My family has several spring birthdays so I've been working on some birthday cards.

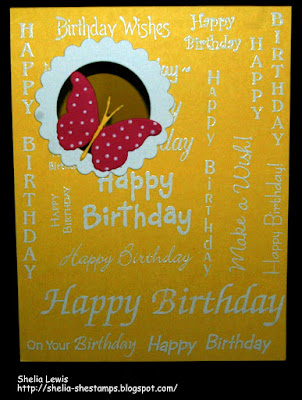
I saw a video by Jennifer McGuire that inspired me. She used a bunch of different greetings to stamp a background on her cards. I took just about every DRS Designs Birthday greeting I could find, arranged them on a piece of CS (in my Misti, of course) and then stamped them with VersaMark ink and embossed them with clear and white EP. I made several of these while I had all the greetings arranged in the Misti. Here are a couple of examples with white embossing:


Once the embossing cooled, I die cut a circle in the card base with Nesties as well as a white frame. Once the frame was glued into place, I added the die cut butterfly. I used a Faber-Castel Pitt Pen to add some white dots to the butterflies.

For a more masculine look, I embossed in clear and added a sail boat.

The sail boat was created with a Darice die and some yellow and blue inks sponged on while still in the die.

These were fun to create and pretty easy with the Misti. And now I have quite a stash of birthday cards for family and friends.

Thanks for stopping by today,
shelia

Monday, March 13, 2017

Happy Hour?

Happy Monday everyone. I'm having fun playing around with this new Tired Woman image recently released by DRS Designs. I think she is a hoot and there are several fun greetings you can pair with her. For my card today I used the Happy Hour Nap Time greeting.


I started by stamping my tired woman with Memento Black ink, colored her with Copics and stamped the greeting beside her before die cutting the panel and frame. I used a Farber-Castell Pitt pen to add the white dots to her dress. To go with those dots, I stamped the white panel with the polka dot background in Versafine Orange ink. An orange dotted ribbon was added to this panel before attaching everything to the orange card base. The tiny birthday greeting was stamped, die cut and attached with a pop dot. Just looking at her makes me want to take a nap!

Thanks for stopping by today.

shelia

Wednesday, March 8, 2017

Tuesday Morning Sketches


DRS Designs is sponsoring Tuesday Morning Sketches this week, so I thought I'd play along. I really enjoy doing sketch challenges.  Here's the sketch.


I took some liberties with the sketch. I turned it sideways and decided to let the end of the branch take the place of the ribbons. Here's my card.


I let various dies do most of the work for this card!  I started with the pink panel, stamped the greeting in the corner and punched the other corner with a MS corner punch. I used SB dies to cut out the blue and white panels, as well as the branch and the two little birds. Once they were all glued together and attached to the pink panel, it was glued onto the white card base. Some dear friends celebrate their anniversary this weekend, so this is for them.

I hope you can join in the challenge at TMS.

Thanks for stopping by,
shelia

Monday, March 6, 2017

Happy St. Patrick's Day


I started by stamping the shamrock background image onto white CS with SU Old Olive ink. Next I used a Taylor Expressions Ray of Sunshine die to cut out the sun's rays with olive CS and the stamped CS. I glued all the pieces onto white CS, using the Olive CS framed. The Irish Good Luck greeting (006D) was stamped with Old Olive ink onto white CS, die cut and layered onto Olive CS. A green rhinestone was added to the center.

Inside the new Love and Laughter Friends greeting (011G) was stamped with Versafine Black Onyx ink. The border at the bottom was created by stamping the Shamrock Swag with Old Olive ink. I used my Misti to line it up.


Be sure to visit our on line store to see all the newly released images. You'll love them!

Thanks for stopping by,
shelia