Monday, April 29, 2013

Happy Monday!!


Wow, can you believe it is the end of April?!! Mother's Day will soon be here! So I thought I'd share a card I made for Mother's Day.  I had my daughter in law in mind while creating this. She loves the color orange.


My card base is orange with a layer of bright yellow CS. On top of that is a white CS layer that was stamped with our new Chevron stamp in VersaFine orange ink. I used Copics to color the yellow chevrons. The main image was stamped in Memento Black ink on white CS, colored with Copics, die cut and layered on an orange scalloped circle. The butterfly was stamped and colored a second time, then fussy cut and glued on with a pop dot. The sentiment was stamped in black on white CS, die cut with a romantic rectangle die, sponged with the VersaFine orange ink while still in the die.The strip of yellow CS was punched with a scalloped border before attaching it to the card. A polka dotted orange ribbon was added to complete the look.  Hope you like it!

Thank you for stopping by today. Hope you have been able to play along in our challenge this week to use pastel colors on your card. 

Until next time,
shelia

Monday, April 22, 2013

Butterfly Wishes


Happy Monday Everyone. Hope you had a great weekend and are ready for the new week to begin!!

I have a friend who is in the hospital so I thought I'd share a get well card that I made for her.


I created my background by sponging Barely Banana, Bashful Blue and Certainly Celery inks in random stripes all over a piece of white CS. Once the inks dried, I stamped the Textured Butterfly in VersaMark ink several times, added clear embossing powder and heat embossed the images. Old Olive ink was then sponged all over the CS. I used a paper towel to remove the ink from the embossed butterflies. I love how the blue, yellow and lighter green inks show up! The Feeling Better greeting was stamped with black ink on white CS along with a few barely banana butterflies, die cut and layered on a scalloped So Saffron oval. Before attaching it to the card, I punched a yellow strip with a MS punch and added it to the card along with a few tiny half pearls. Everything was then layered on a piece of the yellow CS and then attached to the white base.

Hope you like it. Be sure to check out our challenge this week! We'd love to have you join us!!

Thanks for stopping by today.

Until next time,
shelia

Sunday, April 21, 2013

Sketchy Sunday

Hi Everyone, today is Sketchy Sunday at 365 Cards and DRS Designs is their sponsor this week. So I thought I'd play along today. I'm in need of a wedding shower card and thought I'd use our new umbrella stamp. The wedding colors are light yellow and grey.


I started with a white card base, added a layer of light yellow card stock and then a white panel that was embossed with a flower folder. The umbrella image was stamped twice in Memento Black ink on white card stock, colored the images with Copics and layered the panel on light yellow CS that was punched at the bottom with a Fiskars punch. A yellow flourish was die cut and added to the back of this panel before attaching it to the card. The sentiment was stamped in black ink on white CS, die cut with a pennant die, Barely Banana ink was sponged on while it was still in the die. Lastly I created a yellow rose using Spellbinder dies and added it to finish the look. Yellow roses are my favorite flower and I just couldn't resist creating one for this. :-)

Thanks for stopping by. Hope you can join in the fun at 365 Cards this week. You could be the winner of some cool DRS Designs stamps.

Until next time,
shelia

Thursday, April 18, 2013

Challenges

This week's challenge at DRS Designs is to use a bow on your card - a pretty easy challenge. I mean who doesn't love a pretty bow?!!


This card features our brand new umbrella image. It is perfect for showers, weddings, babies, get well cards - the uses are endless. I like that the image is plain and can be colored easily or paper pieced. For this card, I colored the image with Copics and fussy cut it before attaching it to my white panel which was stamped with the raindrop background stamp with gray ink. Before attaching this panel to the card base, a blue sheer ribbon was added. My bow easy was used to make the little bow with is held on with a glue dot. The Rain Down greeting was stamped in black on white CS, die cut and layered on a pink die cut. The For Your Shower sentiment was also stamped in black and die cut with a pendant die. Pretty in Pink ink was sponged on while the image was still in the die. It's layered on the same pink CS to finish the look. Hope you like it.

My next card is for this week's Merry Monday Challenge at Lesley's Always Playing with Paper blog. Here's the sketch we were to use.
 

And here is the card I made.       


I embossed a piece of bravo burgundy CS, rounded the corners and added it to the white card base. Next I added the glitter ribbons and then a piece of white CS that's embossed with the same folder. The Adore Him greeting was stamped in Bravo Burgundy craft ink and embossed with clear powder before die cutting it with a nestie circle. It's layered on a burgundy Floral Doily Motif die. It looked kind of plain so I added the three burgundy rhinestones to the white panel.

Thanks for stopping by today!!

Until next time,
shelia


Monday, April 15, 2013

kitty kats


Hello Everyone! Today I have a fun card to share that would be perfect for those cat lovers we all know and love. :-)


I started by stamping a layer of pale pink CS with the Cat Paw Background stamp in Pretty in Pink ink. The small cat print and happy cat image were all stamped with Memento black ink, cut with nesties circle dies and layered on darker pink CS. The kitty was colored with copics. The Dogs have owners greeting was stamped in Memento black, cut with a nestie oval die, cut in half and layered on darker pink CS. Everything is layered on dark pink and then attached to a white card base. Hope you like it.

This next card is one I created for this week's Seize the Birthday Challenge. I used a big kitty for it.


The background was created using Vicki's Versatile Background stamp on kraft CS. The strip of light brown CS was stamped with the Small Cat Print stamp and the banner was embossed with a cat paw background folder. The King Lion was stamped with Memento Black on white CS, colored with Copics, die cut with nestie circles and layered on the light brown CS.

Thanks for stopping by today. Remember you still have time to join in this week's challenge to use stitching on your card - either real stitching or faux. We'd love to have you play along with us. You can see the details here.

Until next time,
shelia

Thursday, April 11, 2013

Challenges!!

The new challenge this week at DRS Designs is to use stitching on your card - either real or faux. I rarely use stitching, but I do like the look. I was working on this card with the golf cart and I wanted a path for the cart. I cut it curvy, but it still didn't look quite right. I decided to stitch the edges of the path and I think that did the trick!!


This was a simple card to create, other than fussy cutting the golf cart!! I stamped DRS Designs easy grass background all over the green base with Handsome Hunter ink, leaving some spots lighter than others. The sentiment was stamped in Memento Black ink. After adding the cart path and the cart, some dew drops were added to finish it off. Hope you like it!

This week's sketch for the Merry Monday challenge is great for a CAS card. So I was able to find some time to join in the fun.


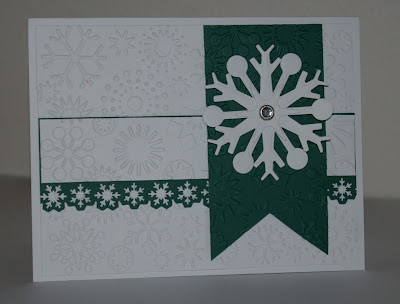
I turned the sketch on its side. No stamping on this, just CB embossing, border punching and Nestie Snowflake dies.

Hope you find some time to join in these challenges! Would love to have you play along.

Until next time,
shelia

Monday, April 8, 2013

conGRADulations!


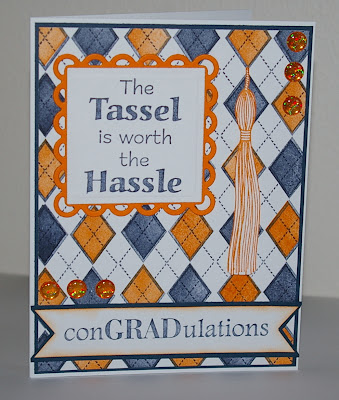
Hi Everyone! Can you believe we are starting the second week of April? It will soon be graduation time, so I thought I'd share a grad card I created using my own high school colors: blue and orange. I started with a white base and added a piece of navy card stock. On top of this is a white panel that was stamped with the Argyle background stamp in Night of Navy ink. I used the small diamond stamp to fill in some of the spaces with navy and pumpkin pie ink. The Tassel is worth the Hassle sentiment was stamped in Night of Navy on white, cut with square nesties and layered on a lacy square nestie in orange. The tassel was stamped in Pumpkin pie, fussy cut and attached with some pop dots. The conGRADulations was stamped in nave, sponged with some pumpkin pie, cut and layered on navy CS. Some orange dew drops were added to complete the look.

Thanks for stopping by today. You still have time to join our most recent challenge - to use paper flowers on your card. You can see the details here. Hope you have time to play along with us!!

until next time,
shelia

Monday, April 1, 2013

Over the Hill?

Hello Everyone. Today I have a fun masculine birthday card to share with you. DRS Designs has some fun masculine stamps. I really like this golfer and the fun birthday sayings you can pair with him. Today I've paired him with the Back Nine Birthday greeting.


My card base is royal blue with a white layer that was stamped with the  brand new Double Chevron card edger in Memento Bamboo ink. The top of this panel was embossed with a CB large chevron folder. The sentiment was stamped in Memento Black ink and cut with a square nestie die and then layered on some Royal Blue and Old Olive CS. The main image was also stamped with Memento Black, colored with Copics, cut into a rectangle and layered on the same blue and green CS. Some blue dew drops were added to finish it off. 

Thanks for stopping by today. Hope you are able to join in this week's challenge. You can see details here.

Until next time,
shelia