Monday, December 28, 2020

Have a Ball

  Happy Monday Everyone. Hope you had a wonderful Christmas as you celebrated the birth of Jesus with family and friends. Things were a little bit different this year with the pandemic, but hopefully with the vaccine this will soon be behind us!!

I have another bowling card to share with you today. I have enjoyed playing with these new bowling images so much. They are easy to color and fun to use! If you know any bowlers you really must get these stamps for your stash!


I started with a piece of bright yellow CS, added the strips of black and red CS, then die cut the panel using a Fawn Lawn rectangle stitched rectangle die. I used the Bowling Strike image as the main focal point, stamping it onto white CS, coloring it with Copics and fussy cutting it out. After attaching it to the main panel I added some Nuvo Crystal Glaze to the yellow bowling ball. The Nuvo Glaze really makes the ball stand out. I split the new Ball on your Birthday greeting, stamping it in opposite corners and my card was done.

Be sure to check out these bowling images and all the other new images here.

Have a Happy New Year!

blessings,
shelia

Monday, December 21, 2020

Merry Christmas!

 Happy Monday before Christmas!! I can hardly believe Christmas is this Friday. I hope you have a wonderful holiday this year, even if it is a bit different than usual due to the pandemic! 


I have a slim line card to share with you today that features the Beauty of the Season greeting.


I started with the white panel and die cut the poinsettia image with a Sizzix die. Next I added a piece of water color paper to go behind the poinsettia that I had colored with some Nuvo Aqua Flow pens in red and green. I added the green panel and the greeting stamped in Old Olive ink and layered on the same green CS, then everything was attached to the white slim line card base. A few gems were added for embellishments.

Merry Christmas!

blessings,
shelia.

Monday, December 14, 2020

Happy Retirement


Happy Monday Everyone. Hope you had a great weekend and found some time to get creative. I took some time off from Christmas card making to create this retirement card. I started by stamping the new post it note calendar image onto the white panel with  Memento Black ink and then I stamped the silhouette golfer over top of the calendar with VersaFine Black ink. I used my Misti for this so I could stamp it several times. The panel was die cut and layered onto some red CS and then attached to the black card base at an angle. The new Brush Happy Retirement greeting was stamped with black ink, die cut and layered onto the same red CS. I think this new blank calendar image is perfect for retirement cards. Nothing says retirement to me more than a totally free calendar!


Thanks for stopping by today. You can check out these images at the DRS Designs on line store here.


blessings,

shelia

Monday, December 7, 2020

Let the good times roll!

 Happy Monday! Trust you had a great weekend and found some time to get inky. Can you believe the first week of December has passed? I don't know about you, but I feel like this year has flown by in spite of all the restrictions due to Covid. I really thought the time would crawl by, but it certainly hasn't!


My cards today feature the new bowling images. I think they are so fun to work with. I am having a ball playing with them!!


For this card I stamped the new bowling birthday greeting and the Strike image onto white CS, colored up the bowling image with copics, die cut the greeting and fussy cut the image. I found some blue CS that matched the bowling ball, die cut it and a window using some Fawn Lawn rectangle dies. After gluing the panel onto the white card base, I inserted the greeting and then glued the fussy cut image below. I added some Nuvo Crystal Glaze to the bowling ball to give it some shine. I really like the way these bowling balls look with the Nuvo glase.

This next card is very similar to another card I shared a couple of weeks ago. .


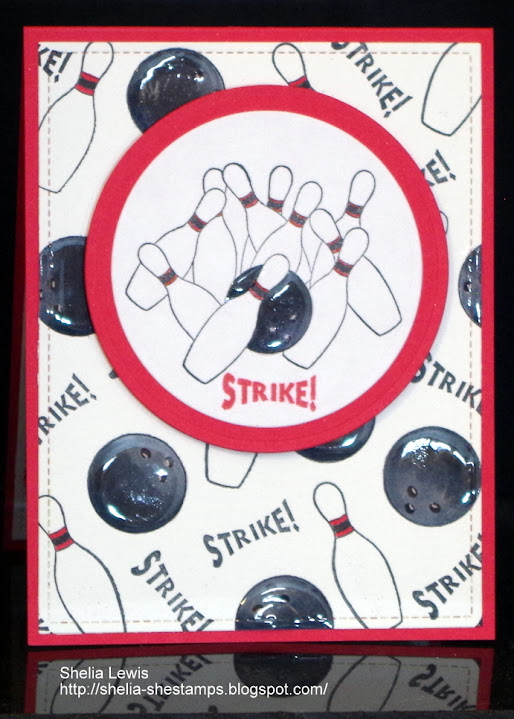
I used the 3 in 1 bowling image to stamp the background. I colored everything up with Copics and once again added some Nuvo Crystal Glaze to the orange bowling balls. Once the glaze dried everything was added to the orange card base, including the Bowling Birthday greeting that was stamped, die cut and layered on the same orange CS. This was super easy to create and I really like the look. If you know any bowlers, these new images are a must have for your collection of stamps.

Thanks for stopping by today.

blessings,
shelia


Wednesday, December 2, 2020

A Hug for you


I created this card for this week's sketch challenge at Tuesday Morning Sketches. It's a fun sketch and easy to use.  Here's a look at the sketch.


I'm working on some cards to give my mom for her to give to friends and thought this adorable little girl from MFT with her outstretched arms would be perfect for this season. I think we could all use a hug or two. Since we can't give hugs for real, what's better than a paper hug. I'm pretty sure my mom will have someone in mind to share this with.


Thanks for stopping by.


blessings,

shelia

Monday, November 30, 2020

Love and Laughter

 Happy Monday Everyone. Hope you had a wonderful weekend and found some time to get creative. I've been having fun playing with the newest images DRS Designs recently released. I think you are going to like them! 


Today's card features the new Love and Laughter greeting. I paired it with a house image from the all in one Christmas Village. Since it's almost winter and that means snow here where I live, I thought a snowy house would be appropriate. Anyway, here's the card.


The card is pretty self explanatory. I stamped the greeting and image onto white CS, colored the image with Copics, die cut and layered them onto cranberry CS. The white panel was embossed with a Darice EF and layered onto the same cranberry CS before attaching it to the white card base. A few cranberry gems complete the look. I really like how this card turned out. I think it's perfect for someone purchasing a new house this winter.


This next card uses the same greeting, but this time I paired it with a die cut house. I have no idea what die was used to cut the house. I die cut it years ago at a friend's house, but never used it. Because of the size of the die I went with a slim line card.


I created the card base with black CS and then die cut the white panel with a Dare 2 B Artsy die. Using some Nuvo Deluxe glue I added the die cut house towards the bottom of the panel, leaving room at the top for the greeting, which was stamped and die cut then sponged with some light blue ink while still in the die. It's layered onto black CS and then popped up with foam adhesive. A few enamel dots were added and the card is done!

Thanks for stopping by today!

blessings, shelia


Monday, November 23, 2020

Have a Ball on Your Birthday!

  I know Thanksgiving is this week here in the USA, but with these fun new images from DRS Designs I just had to share some birthday cards I created.


This first card uses the new Strike 3 in 1 Bowling Designs image (214D). I cut the image apart so I could place the different images where I wanted and stamped them with Memento Black ink onto white CS, die cut with a Fawn Lawn rectangle die and then colored the images with Copics. I also stamped the Bowling Strike image (240H) onto white CS, colored it with Copics, and die cut it. I used my Misti to line up the word strike from the 3 in 1 bowling Design image and stamped it in Memento Ladybug red ink. Before putting the card together I decided to add some Nuvo Crystal Glaze to the bowling balls so they would be shiny and stand out more. Bowling balls are shiny, aren't they? I haven't been bowling in ages! Anyway, once the glaze dried I put the card together, using foam dots for the main image. I really like how this card turned out. Wouldn't this be the perfect birthday card for an avid bowler? My dad, when he was younger, liked to bowl so this will probably be his birthday card this year. 

My next card uses the new Ball on your Birthday greeting (207D) along with the basketball image from the 4 in 1 sports image. I stamped the basketball onto white CS, colored it with some Copics and fussy cut them. The background panel was embossed with a Sizzix Cobblestone 3d EF. I think it looks a lot like a basketball. The new greeting was stamped onto cream CS and die cut with a banner die. I also created a banner for the basketballs and popped them up with some foam dots.


Thanks for stopping by today. Hope you have a wonderful Thanksgiving and find some time to get crafty. You can see all the new images here at DRS Designs,

blessings,
shelia


Monday, November 16, 2020

Merry Christmas

  Happy Monday! Trust you had a great weekend and found some time to get creative. I don't know about you, but I just got my Thanksgiving card in the mail and have been busy working on Christmas cards. I do a few Christmas cards each month, but I still end up scrambling to get all of my Christmas cards completed on time. Yikes.


This card was fairly simple to create. The most time consuming part was coloring the image. I was a little intimidated by this image with its tiny leaves, berries, etc. But it really wasn't all that difficult to color. Once it was colored I die cut it with a SB oval die and layered it onto some cranberry CS. The white panel was embossed with a CB embossing folder and then attached to the cranberry card base. I did add some Nuvo Crystal Glaze to the flame and holly berries. My mom loves cardinals and I know she will love this card.


Hope you are doing well. Thanks for stopping by. You can see this gorgeous image and all the other new images here.


blessings,


shelia

Monday, November 9, 2020

Thinking of You

  Happy Monday! Are you having unseasonably warm weather where you live? We are!! Today and the past few days have been in the 70s with lots of sunshine. And to think we had snow flurries last Sunday. Such goofy weather, but I have been enjoying the warmth. Even with the warmer weather, I'm still  working on Christmas cards.


I saw a Jennifer McGuire video recently where she uses Perfect Pearls in a variety of ways. Since I have had some Perfect Pearls in my stash for years, I decided to try out one of her techniques. I stamped the trees from the tree and mountain 2 in 1 image with a couple of different green inks. I left the stamp in my Misti so I could stamp the image again with VersaMark ink and then I applied a little Perfect Pearls to just the tops of the trees. I stamped it again with VersaMark ink and then heat embossed with clear EP. I did that three times and fussy cut the trees. I splattered some pearly white water color paint onto some navy CS which I used for the background panel and die cut for the focal point. The 3 rows of trees were added before I die cut the circle. After stamping the greeting onto the white panel the circle was added with foam adhesive for some dimension. It's hard to see the sparkle in the photo, but it really does shine in real life.


Thanks for stopping by today. Hope you are getting a head start on your Christmas cards. You can get some inspiration at DRS Designs here.


blessings,


shelia

Monday, November 2, 2020

Gnome for the Holidays

  Happy Monday Everyone. Hope you had a great weekend and found some time to get creative. We had some snow flurries yesterday with strong bitterly old winds, so it was a good day to stay in and stamp! Here's the card I created.


I started with a piece of watercolor CS, stamped the woodgrain background onto it and then sponged on some DO inks in browns. While that dried I stamped, colored and fussy cut the peeking gnome and toad stool images. The string of Christmas lights was stamped with Versafine Black ink and heat embossed with clear EP. I used a small paintbrush and water to remove the DO ink from the light bulbs and colored them with various Copic Markers. Next I die cut the window from the front panel, marked off the inside of the window and stamped the new Gnome for the Holidays greeting and potted Christmas tree image, which I colored with Copics. Once everything was colored, I assembled the card. The woodgrain panel is popped up with foam adhesive, as is the peeking gnome. The mushrooms and grassy border are glued on. Last I added some clear Nuvo drops to the Christmas lights and tree bulbs and then some white Nuvo drops to the white spots on the mushrooms.

I really like how this turned out. That peeking gnome is my favorite gnome and I knew I wanted to use him on my card.

Thanks for stopping by today. You can check out the newest images as well as all the awesome images and greetings from DRS Designs here.


blessings,

shelia

Monday, October 26, 2020

Season's Greetings

 Happy Monday Everyone. Trust you had a great weekend and found some time to get crafty! I'm working on Christmas cards using some of the newest releases from DRS Designs. My card today is a simple one that features our tall snowman and the new tiny season's greetings.


I started with the white panel, stamped the snowman, covered him with a mask, stamped the snow lines and the falling snow. Keeping the snowman masked, I created a mask for the snow lines and then sponged in the sky with some blue DO inks. I colored in the snowman and added some blue to the snowlines with Copic markers. The  new greeting was stamped with Versafine Oynx ink and die cut with an old SB die. I sponged the edges with some red ink and used a black pen to add the line for the flag pole the snowman is holding. After die cutting the panel with a Fawn Lawn rectangle die, I added some black Nuvo drops to the coal buttons and then added the panel to the red card base. 

I really like the combo of red and blue for snowman/Christmas cards. It just seems so festive to me.

Thanks for stopping by today. Be sire to check out all the new images here.

blessings,

shelia


Monday, October 19, 2020

Thinking of You at Christmas

  Happy Monday Everyone. Trust you had a great weekend and found some time to get crafty. DRS Designs has just released some new Christmas stamps and I think you are going to like them a lot. Be sure to stop by each day to see how the designers use the new images and greetings for some inspiration. Both of my cards today use the new Thinking of You at Christmas greeting (183D).


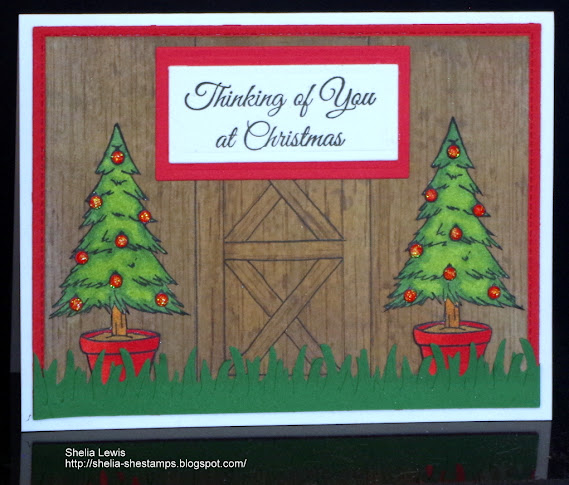
I started with a piece of kraft CS, stamped the door and wood grain background image with Memento Cocoa ink and then sponged on various shades of brown ink and some white. I was trying to create a bit of a weathered look. Anyway, I cut the piece down, added it to a red panel and then used a black pen to draw in the door to give it a bit more definition. The new Potted Christmas Tree image (182G) was stamped twice onto white CS, colored with Copcis and fussy cut. After adding the punched grass border I glued the trees on tucking the pots into the grass. The new greeting (183D) was stamped with black ink onto white CS, die cut and layered onto the same red CS. Everything was added to the white card base and then I added some Nuvo Blizzard drops to the red ornaments on the trees. I like the shimmer and dimension those drops add.


My next card is a quick and easy shaped card. I used a spellbinders stocking die to create the shaped, sponged on red ink using a TH stencil, added the toe and heel part as well as the rim of the stocking. On the rim I stamped the new greeting (183D) with VersaMark ink and heat embossed it with white EP. A star button and baker's twine finish it off.


I think this die will work to create gift card holders. Our family always hangs one gift on the tree for each person and I think some of these on the tree will be fun. Plus I can personalize each one. I guess I'd better get started!

Thanks for stopping by today. You can check out all the new images here.

blessings,

shelia

Monday, August 31, 2020

The beauty of autumn

  Happy Monday! Trust you had a great weekend! I have another slim line card to share with you today. I saw something on Pinterest (I think) and was inspired to create this coffee cup card. I also recently found Pumpkin Spice Almond Milk Creamer!! So I'm enjoying my coffee even more than usual.


I stamped the coffee cup with Memento Black ink onto various shades of oranges, green and yellow CS, fussy cut and sponged some DO ink along the edges. I also stamped the cup again onto cream CS along with the lids. These too were sponged with DO inks and then glued together. I had some watercolor paper that had been colored with DO inks in fall colors. The leaves were die cut from that paper and glued onto the cups. The beauty of Autumn greeting was stamped onto the same cream CS, die cut and sponged with the same DO ink, Everything was added to the cream CS, then the orange layer and the cream CS.

Here's a look at the inside.


I added another coffee cup to the inside along with the Goodbye Summer greeting,

This card makes me happy and now I want to invite some friends to go out for coffee. But with this pandemic still happening, I'll have to wait a bit longer. Hope you are all staying safe and healthy!

Thanks for stopping by today.

blessings,
shelia


Monday, August 24, 2020

Birthday Flowers

 Hello. I created this card for the 500th challenge at Cupcake Inspiration Challenge. I can hardly believe there have been 500 Cupcake Challenges. That's pretty amazing. Just think of all those wonderful cupcakes! I always get hungry for delicious cupcakes when I do one of these challenges. :-)


I wanted to use these flower dies from the small die of the month set in July. With mail service rather sketchy right now, I didn't get these till the end of July and am just now using them. I decided to go with a rainbow of flowers. I really like the way this turned out. It's such a cheerful and fun card. I die cut the Happy Birthday out of white CS 3 times and glued them together to give the greeting some dimension.


Here's the cupcake for this week's inspiration.


Thanks for stopping by today.


blessings,

shelia

Wednesday, August 19, 2020

Trick or Treat

 Thanks for stopping by today. My card today uses this week's sketch from Tuesday Morning Sketches.

I decided to create a not so scary Halloween card for one of my younger grandchildren. Even though it uses ghost images I think the Trick or Treat sentiment tones it down. I'm pretty sure my 5 year old grandson will love this.


I stamped the 4 ghosts onto vellum with VersaMark ink, heat embossed them with white EP and fussy cut them out. The starry background and greeting were also stamped with VersaMark ink, heat embossed with white EP and die cut. I arranged the ghost around the greeting so they could be glued to the back of the white circle since it is so difficult to attach vellum without the glue showing. Everything was attached to the white card base.


Here's the sketch from TMS:


Isn't it a great sketch?! I think I will be making more cards with this design.


blessings,

shelia

Monday, August 17, 2020

slim line cards

  Happy Monday Everyone. Trust you are staying safe and healthy during these rather difficult times. I don't know about you, but I'm having a hard time keeping straight what is happening. Our local schools were to open with in person classes, then it went to remote, now it looks like some will be remote and some in person. I really feel for our teachers and students right now. So many changes and cancellations. 

I've been working on Halloween cards for my grandkids. Kind of wonder if kids will even be able to do trick or treating. So I'm working on some special cards and gifts for them! Here's a card I made for my oldest granddaughter. I went with a slimline shaker card.


The die cut images are from a Spellbinders Large die of the month set from September 2018. I used three of the dies to cut out the black panel spacing them evenly. The Halloween greeting was stamped with VersaMark ink and heat embossed with white EP. I added some foam tape to the back of the black panel and the in between spaces, added some black, orange and clear sequins and then attached the orange panel to the back. The completed panel was attached to the white card base.


My next card is also a slimline card, but not for Halloween. My father in law just celebrated his 98th birthday, Covid style, alone! This is the card I made for him. He really liked the long tall look.


The only stamping on this card is the splatter background which was stamped in two shades of blue ink. Everything else was die cut from blue CS to match the two blue inks in the background. Once the die cut pieces were added to the stamped panel I layered it onto a dark blue panel and then onto a light blue card base. I really like how this one turned out.

I haven't purchased any slimline dies yet, but these are so fun to make I'm seriously considering it.

Thanks for stopping by today. Stay safe and have fun stamping and creating!


blessings,

shelia

Monday, August 10, 2020

Trick or Treat

Hi Everyone. Hope you are doing well and staying healthy. Can you believe it is this far into August already?! Where has the time gone. You'd think with the pandemic time would feel like it was barely passing by.

I have a couple more Halloween cards to share with you today. This first one features Count Porkula, my absolute favorite Halloween image from DRS Designs. I think he is just adorable!


I made a little scene for Count Porkula using the new Halloween Silhouette Tree, the grave yard border image and the single gravestone image. I stamped the graveyard border and silhouette tree images with Versafine Black ink and heat embossed them with clear EP, then I sponged on the ground and sky using various DO inks. The greeting was stamped onto white CS, heat embossed and die cut to look like a full moon. The small flying ghost was stamped onto Vellum and heat embossed with white EP, fussy cut and glued behind the moon. Count Porkula was stamped with Memento black ink onto white CS, colored with Copics, fussy cut and glued into the scene.

My next card is very similar to my first card. I again created a scene using the Silhouette Halloween Tree image, but this time I paired with the grim reaper image.


This time I sponged on the ground and sky first, then stamped and heat embossed the tree and grim reaper images.  I added the accent bats in the corner, colored in the sickle and reaper's hand with some watercolor paints and then stamped, die cut and added the greeting with some foam adhesive.

Thanks for stopping by today. You can see all the new and older Halloween images here.

shelia

Monday, August 3, 2020

Frightful and Delightful

Hello Everyone. Trust you had a great weekend and found some time to get creative I've been having fun trying out the new Halloween images from DRS Designs. I especially like the two new ghosts images and I have a couple of cards to share with you today that feature those images.

The first one uses the leaning ghost images which I stamped with VersaMark ink onto Vellum, heat embossed with white EP and then fussy cut. The greeting was stamped with Versafine Black ink onto white CS, layered on some pale yellow CS and then I added some spiders from the 4 in 1 Halloween Silhouette image. The spooky village image were stamped onto a white CS with Versafine ink, heat embossed with clear EP and then the sky and moon were colored in with DO inks. Everything is attached to a black panel that was embossed with a Darice spider web folder. It's hard to see in the picture, but does show up pretty good in real life. The two ghosts were added by gluing just parts of them behind the greeting panel.


For the next card, I created the background by sponging on various DO inks in blues and purple. I splashed on some water droplets and then die cut it using a MFT Blueprint sketch die set. I then die cut it again four times using black CS. I glued two of the die cut frames together and then added the small flying ghost around the frame. Once that dried I added two more frames behind so it looks as if the ghost really are flying. The greeting was stamped with VersaMark ink and heat embossed with white  EP. Everything was added to the white panel which was die cut with the same set of MFT Blueprint Sketch dies and then layered onto the white card base. I think this one might be my favorite of all the Halloween cards I've created so far.


Here's a close up of the ghost panel. The ghosts were stamped with VersaMark ink onto Vellum, heat embossed with white EP and fussy cut.


Thanks for stopping by today. Have a wonderful week and enjoy your creative time. Be sure to check out all the new Halloween images here.

shelia

Monday, July 27, 2020

Halloween Squares

Happy Monday! Hope you had a wonderful weekend. It's been rather hot and humid here. Not my favorite weather, so it's been nice to stay indoors and stamp away! I've been having lots of fun playing with the new Halloween images just released by DRS Designs. You can see all the new images here.

I started these two cards by cutting out a bunch of squares in green, orange, purple and yellow CS. For the first card I used only the green and orange squares and stamped the scary cat from the 4 in 1 Halloween Silhouette image  onto each square with Versafine Black ink. After gluing all the squares onto a black panel I added the stamped cat on the moon image along with the purrfect Halloween greeting. I added some Nuvo Aqua Shimmer pen to the moon. My oldest granddaughter loves cats and she will be over the moon for this card!


For my second card I used all the colored squares and all of the images from the 4 in 1 Halloween Silhouette images to stamp the squares, again with Versfine Black ink. After attaching all the squares to a black layer I added the Deco Halloween Greetings that was stamped with VersaMark ink and heat embossed with white EP onto black CS. I added some rhinestones to some of the squares.


You can check out all these new images as well as all of the Halloween images at DRS Designs on line store.

Thanks for stopping by today.

shelia

Monday, July 20, 2020

In the spirit of Halloween...

Happy Monday Everyone! Hope you had a wonderful weekend and found some time to get inky. DRS Designs is  releasing some fabulous new Halloween images that I think you are going to really like. If you check the blog regularly you have already seen several cards using the new images. Aren't they great!

My cards today feature the new ghost image(1104F) and Spirit of Halloween greeting(010D). When I saw the ghost image I had this idea of lining them up in a row holding hands, kind of like a line of dancers. So I stamped a bunch of them onto vellum CS with Versamark ink and heat embossed them with white EP. Ghost images on vellum look so cool to me. After cutting them all out, I inked up the background with some DO inks to create the night sky. Once that dried I stamped the new greeting with VersaMark ink and embossed it with white EP too. Then as I started to put the card together I remembered that adding vellum to cardstock is a bit tricky. I had forgotten about that detail. So I had to figure something out and decided to add just a drop of glue behind the eyes, mouth and along the feet part. I did pretty good with the glue, but there are some places where you can see it through the vellum. I still like the ghosts stamped onto vellum, but I think I might need to figure out another way to attach them to the card. I actually made two cards using the ghosts, one A2 size and one slimline.  Here they are:


The inside is the same on both cards.


I like less scary Halloween cards and thought this would make a fun inside for my line up of ghosts. I used the Trick or Treat greeting and the candy corn image. As a kid Halloween was all about the candy! Still is.

Thanks for stopping by today. You can see all the new images here.

Shelia

Friday, July 17, 2020

Boo!

Hello Everyone,

I have a card I created using this week's sketch from Tuesday Morning Sketches. It's a great sketch with lots of possibilities. Here's my card:


And here's the sketch:


I stated by stamping the ghost family with Memento black ink onto white CS, colored the ghosts with some Copics and after it dried added some Rubber Cement glue to the image as a mask so I could sponge on some dark blue and black inks for the sky and ground, The image was die cut and layered on some orange and then black CS. The dp is some that I've had in my stash for years and I thought it would make a good background for my little ghosts. I added a die cut Boo and a punched border of spider webs. I found one spider sticker in my stash and since it had the purple gem for its body I added it to go with the purple socks some of the ghosts are wearing.

I really like the way this turned out and will definitely be using this sketch again!!

Thanks for stopping by!

shelia

Thursday, July 9, 2020

TMS Challenge 562


Hello Everyone. I have a card to share with you today that uses this week's sketch from Tuesday Morning Sketches. This is their 11th Anniversary! Wow, they've been sharing sketches for quite a long time. I enjoy sketch challenges a lot.

Here's this week's sketch:


And here's my card:


I went with portrait rather than landscape and since I'm behind on my monthly quota for Christmas cards I decided to make my first out of four for the month of July. I stamped the snowman image with Memento black ink, colored him with Copics and die cut the panel with a Fawn Lawn stitched rectangle die. The greeting was stamped with SU Cranberrry Crisp ink and heat embossed with clear EP, then die cut with a stitched oval die from ODBD. The cranberry panel was stamped with the splatter background and die cut with a larger rectangle die from the same Fawn Lawn set. The small strips of white and the long cranberry strip were stamped with a snowflake background stamp. The snowman panel and greeting oval are popped up with foam tape. I added some punched snowflakes with blue half pearls to complete the look. It's so hot right now that I actually felt cooler just stamping and coloring this snowman. I'm going to have to make some more snowmen cards tomorrow!  LOL!

Thanks for stopping by.

blessings,
shelia

Monday, June 29, 2020

Happy 4th of July!

Hello Everyone. Hope you had a great weekend. My card today is in honor of the USA's upcoming Independence Day celebration. I found this fireworks stencil and thought it would go perfectly with DRS Designs' new 4th of July greeting. Plus for many of us these may be the only fireworks we get to see this year. My town cancelled the fireworks for the 4th. Kind of disappointing, but then most everything is rather crazy right now.

Here's my card.


I started with the blue CS panel and used some embossing paste with the stencil. While that dried I stamped and die cut the new 4th of July Sparkle greeting. To add a little more sparkle to the card, I added some Nuvo Aqua Shimmer Pen to the word Sparkle. Everything was glued onto a white card base. This was super easy to create once the stenciling was dry.

Thanks for stopping by today. Have a wonderful week.

blessings,
shelia

Tuesday, June 9, 2020

A nurse brings...

This week DRS Designs is sponsoring the challenge at Thru the Craft Room Door. It's an Anything Goes challenge. So I thought I'd share a card using the new A Nurse Brings sentiment and a new to me background technique I learned yesterday at Splitcoast Stampers Technique Challenge.

The background was created using plastic wrap and inks. You just crumple up the plastic wrap dab it into your ink pad and stamp onto your CS. I used some older SU inks, Certainly Celery, Pretty in Pink and Almost Amethyst. I really like the look this technique creates and will definitely be creating more backgrounds with it. Plus it is super easy to do!

The sentiment was stamped with Versafine black ink onto white CS, die cut and layered onto a matching layer die cut from Certainly Celery CS, The background panel was die cut with a Fawn Lawn rectangle die and layered onto a Certainly Celery card base. Some green rhinestones and a pink punched heart (covered in Nuvo Crystal Glaze) complete the look.

I hope you can find some time to play along with this new challenge. You could be the winner of a $20 gift certificate from DRS Designs.

Thanks for stopping by.

blessings,
shelia

Monday, June 8, 2020

A Nurse Brings...

Happy Monday Everyone. Trust you had a great weekend. DRS Designs has some new images that will soon be available and today I get to share one of the new sentiments called A Nurse Brings...
Both of my cards today only use part of this new sentiment (1084H). With all that's going on with the Covid 19 Pandemic, it's nice to have a greeting especially geared towards nurses.


 I watched some videos on You Tube showing how to make paper masks for cards. I tweaked it a little to make it more to my liking. They are pretty easy to make. You need a piece of lighter weight CS cut to 2 3/4 by 2 1/8 inches, scored at 1/2, 5/8, 1, 1 1/8, 1 1/2, and 1 5/8 inches. You fold every other one mountain and the others valley to create the mask. I added some strong tape to the back to hold the folds in place and then added a piece of folded CS for the edges and baker's twine for the elastic. The background was created using the Woven Plaid background with a couple of DO inks that were also used stamp the splatter background onto the mask. The partial greeting was stamped with the same orange ink, die cut and layered onto orange CS to match the mat for the plaid piece. Some orange gem stones finish it off. I really had fun creating this and will definitely be making some more of this little masks. One video I watched stuffed the mask with cotton balls so it had some dimension, It actually looked like someone was wearing it. Not sure how you'd mail that, so I just left mine flat.

My next card using the same partial greeting, this time it's paired with the little boo boo bear who is covered in bandages. I stamped a piece of kraft CS with the bandage image using light brown ink, cut it into 1/2 inch strips and glued them at an angle onto the card base for my background. The little bear was stamped with Memento Black ink, colored with Copics, die cut and layered onto brown CS. I die cut a little heart, glued it onto the bear and added some Nuvo Crystal Glaze. The greeting was stamped with Versafine Black ink, die cut, and layered onto the same brown CS. I added some baker's twine before attaching it to the card base. This time I added some clear gem stones.


Be sure to check back all this week to see how other DT members use these images. 

Thanks for stopping by.

blessings,
shelia

Monday, June 1, 2020

Happy 4th of July

Happy Monday Everyone. Hope you had a wonderful weekend. I have some 4th of July cards to share with you today featuring the new Sparkle greeting, as well as the patriotic bunting and streamers. These new images are fun to work with and have lots of options for use.


I started with the white panel and stamped the streamers along the top of the card, colored them with copics and then added glue to the stars and then sprinkled on some silver glitter. The greeting was stamped with Versafine Black ink, die cut and layered on some blue and red CS. Everything was added to the red card base. The lower left-hand corner looked rather empty so I went through my stash and found these strips of gem stars and thought they'd fill in the space nicely. At least it really does sparkle like the greeting says.


This card uses the same greeting, stamped in blue ink and embossed with a clear iridescent EP, and the bunting image. I created this for a Splitcoast challenge to make a front flap card. You can see the challenge here. For the background I stamped the stars and stripes border in blue. This front fold flap was a fun card to create and I really like the look. I'll definitely be making some more of these.

Thanks for stopping by today. You can see all the new images from DRS Designs here.

Blessings,
shelia

Saturday, May 30, 2020

TMS Challenge

Hi Everyone. I finally found time to create a card for this week's sketch challenge at TMS. It's an easy and fun sketch.

Here's the sketch:


And here's my card.


I started with the white panel and sponged on various TH DO inks using a Hero Arts Stencil. Once it dried I die cut the panel using a FL rectangle die, added the baker's twine and then attached the panel to the black card base using foam adhesive. The butterfly was stamped with Altenew Jet Black ink onto white CS, die cut and layered onto black CS. This piece was also attached with some foam adhesive. I added some black gems to the center of the butterfly, which is kind of hard to se in the phote.

I decided not to add a sentiment at this time. I'm not sure yet what type of card this will end up being. Thanks for the fun challenge! And for stopping by.

blessings,
shelia

Monday, May 25, 2020

Happy Memorial Day!

Happy Memorial Day! I have a couple of patriotic cards to share with you today. The first one uses the new silhouette soldiers, which I stamped in Versafine black ink ad=nd embossed with clear EP. Next I stamped the Camo background image in various shaded of green and brown ink. The panel was die cut and layered onto a kraft card base. The sentiment was stamped with brown ink onto the same kraft CS, die cut and layered to the left side.


The next card features the new patriotic bunting image. I stamped it three times onto white CS, colored with Copics and fussy cut. The fence was die cut using a Memory box die. The greeting was stamped with Versafine Blue ink, heat embossed with clear EP, die cut and layered onto a red die cut banner. The background was created by sponging some green ink onto the bottom of the card and then I stamped the easy grass background image as well. The sky was sponged with light blue ink using a MFT cloud stencil. I stamped a few birds for some added interest.


Hope you have a wonderful day and thanks for stopping by! You can see all the recently released images here.

blessings,
shelia